Hi again,
I’ve recently encountered another problem when using AWS for my side projects. My problem is that I have two EC2 instances in different regions, and I want to be able to easily communicate between the two services without assigning public IPs to each of them. To be clear, it’s not an actual problem in AWS, but is something that took me a little while to get to grips with, so feel it was worthy of a blog post.
I’m conscious of the fact that I want to make this example as easy to follow as possible - so we’ll work with the following example:
Let’s say I have a server running in the eu-west-1 region in AWS. This is an extremely simple server app, that when invoked with the path /say-hello?name=Angela it will return the following response:
Hello, Angela!
For convenience I’ve pushed a repository to the Docker Hub that will easily start a server that will do just this:
sudo docker run -dt --rm -p 80:8080 jamiemcl001/say-hello-server:latest
Let’s say that we have another service running in a different region (lets say North Virginia or us-east-1). If we presume that this new EC2 instance needs to consume the service in the other region then there are a couple of ways that we could do this.
First off, we could ensure that the first service has a publicly accessible endpoint, and set up our security groups so that port 80 could always be accessed via the outside world. Now this doesn’t seem so bad with our very contrived example, but what if we actually had sensitive data returned as part of this API call? I know that I wouldn’t feel too comfortable about having that available for anyone to hit and potentially hack…
So, what’s our other option? We could ensure that our server has no publicly accessible IP address and instead look to communicate from within our private VPC’s? This is far more desirable, but at the same time, just how easy is it?
Well it turns out that it’s very easy if we had two services sat in the same VPC that wanted to communicate with each other. In the AWS console we would see something like:
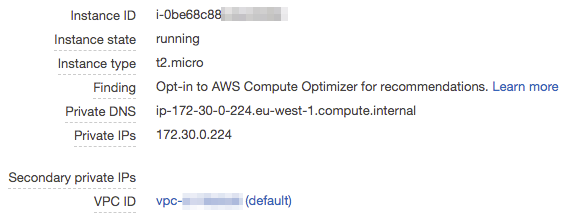
Now we could easily just run a cURL command on another EC2 instance in the same VPC and successfully see our response. Running curl ip-172-30-0-224.eu-west-1.compute.internal/say-hello?name=Angela gives us back our expected Hello, Angela! response!
The problem arises when we try and hit the endpoint ip-172-30-0-224.eu-west-1.compute.internal from an instance that isn’t in the same VPC as the other. It will simply fail to resolve it and instead we’ll see an error like ping: ip-172-30-0-224.eu-west-1.compute.internal: Name or service not known. So, how do we get around this now???
Creating a VPC Peering Connection
If we go to the VPC console in AWS we can see an option down the sidebar which is named “Peering Connections”. Creating a new Peering Connection will allow us to set up routing in AWS which means that the two individual VPCs will be able to see one another. Click on “Create Peering Connection” and we will go through all of the options…
First off you will want to begin with copying the ID of the VPC you would like your North Virginia VPC to connect to. So if we change regions to eu-west-1 and take a look we will see the only VPC we have available in Ireland is as follows:
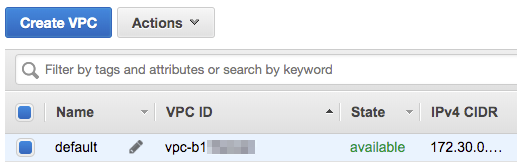
Make a note of the VPC ID (and the IPv4 CIDR block as we will be needing that later on in this post), and then switch regions back to us-east-1, so that we can set up our peering connection.
Now that we have the ID and are back in our selected region we can input all of the information required to setup the connection. When you click on the VPC (Requester)* checkbox you will be presented with a dropdown box of all the VPCs in your current region. As we have only one we can go ahead and select it immediately.
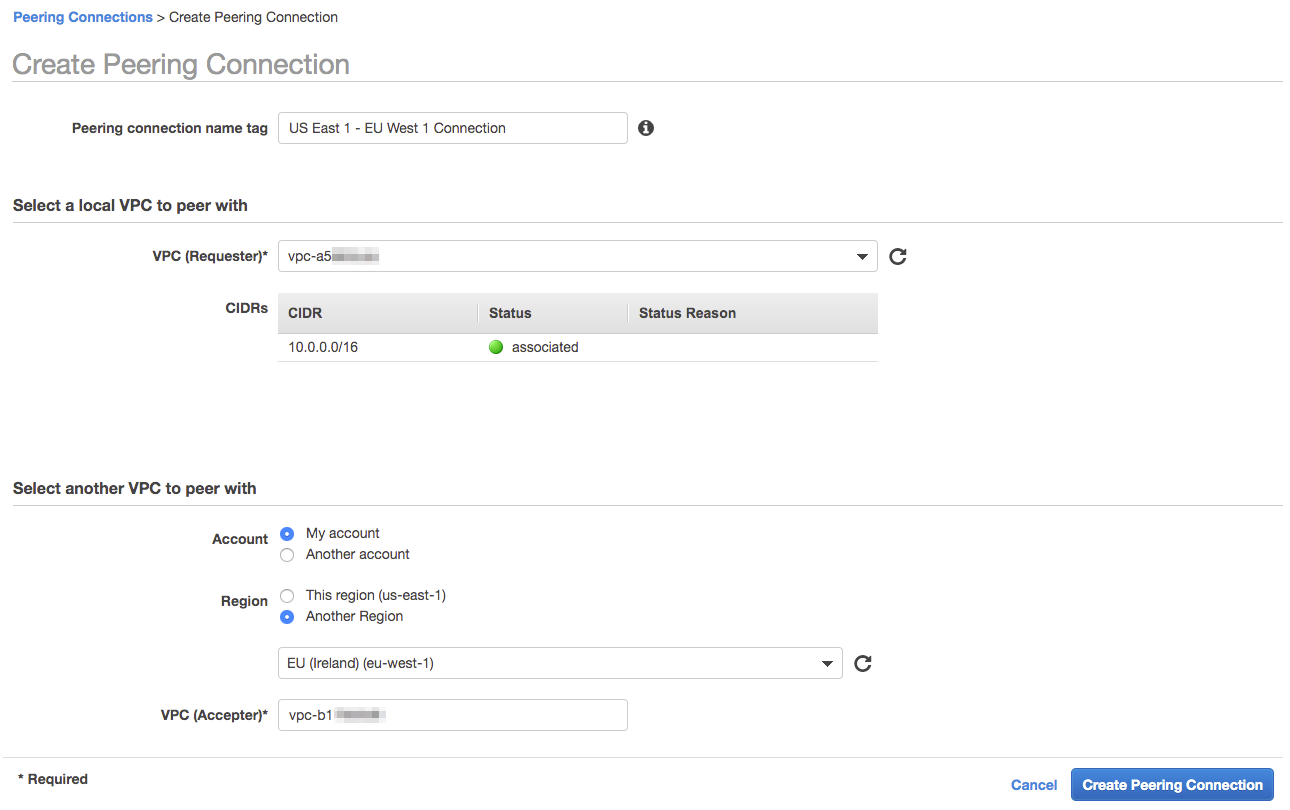
The only other thing we need to change from the defaults is that the VPC we would like to peer with is in another region, and we need to paste in the ID of the VPC we want to connect with in Ireland. Once you click “Create Peering Connection” it will set up a peering request that we will need to go ahead and accept in the other region. Let’s go ahead and change our region back to eu-west-1 so that we can accept it…

If we right click on the row of the peering connection then we are presented with the option to Accept the peering connection. If we click this then a popup will show just to present us with all of the information of the connection and we can hit accept and have it be enabled.
Note that a popup will immediately show to ask you to set up the routing tables. We will do this, but not just yet. We want to enable one more thing first…
Once the peering connection has been created we want to make it so that our service that is located in the US can resolve to the private hostnames in our eu-west-1 VPC. In order to do this, select the connection and right click. Among the options, there is an option to “Edit DNS Settings” - lets set this up by clicking this and we’ll see the following screen:

Selecting the option “Accepter DNS resolution” means that the hostname we were trying to resolve earlier from the US service (ip-172-30-0-224.eu-west-1.compute.internal) will now actually be able to resolve successfully, so lets select it and hit save.
Now that we have set up the peering connection correctly we need to ensure that our US service actually knows how to route requests that are intended for the eu-west-1 service through the peering connection, and not just drop those requests on the floor. To do this we need to first change our region back to us-east-1 and then go into the “Route Tables” section of the VPC console.
You’ll need to go ahead and select the route table associated with the VPC that we have just set up the peering connection for, and then right click and select “Edit Routes”. (This is where we’ll need the IPv4 CIDR block from our European region, as I mentioned earlier…)

We’ll want to go ahead and hit “Add route” and paste in the IPv4 CIDR block for our eu-west-1 VPC, so that all IP calls/DNS requests that resolve to the that block will be routed through the peering connection. If we click on the target dropdown we’ll want to select “Peering Connection” and then the name of the Peering connection we inputted when we first created it. Hit save and this will begin to propagate through all of our VPC.
Now we want to enable bi-directional communication - so we’ll go ahead and change the DNS settings for the peering connection to allow hostname resolving from the acceptor VPC (note that we’ll have to change the DNS settings in our us-east-1 region to allow the acceptor to resolve the hostnames), and then setup routing in our eu-west-1 VPC to route calls to 10.0.0.16 (as this is the CIDR block for our US VPC) through the same peering connection. This will enable our service in Europe to communicate back with the US VPC.
With all of these changes, if we now SSH into the US EC2 instance we can try and make our API call once again:
curl ip-172-30-0-224.eu-west-1.compute.internal/say-hello?name=Angela will return us with Hello, Angela! 🎉🎉🎉
Taking it one step further with Route 53 Private Hosted Zones
OK, so now we can hit an endpoint from a different VPC - job done, right? Well we could go one step further and make it so that instead of hitting the endpoint ip-172-30-0-224.eu-west-1.compute.internal directly, we could hit an endpoint like, say, api.internal and be able to resolve in the same way as before. But how do we do this?
Amazon Route53 is a fully fledged DNS service, and one of it’s features is “Private Hosted Zones”. This feature allows you to create DNS entries that will be accessible to services within associated VPCs.
We’ll start off by creating a new Private Hosted Zone. We’ll do this by going to Route53 and clicking “Create Hosted Zone”, and we can fill in the form with the following details:
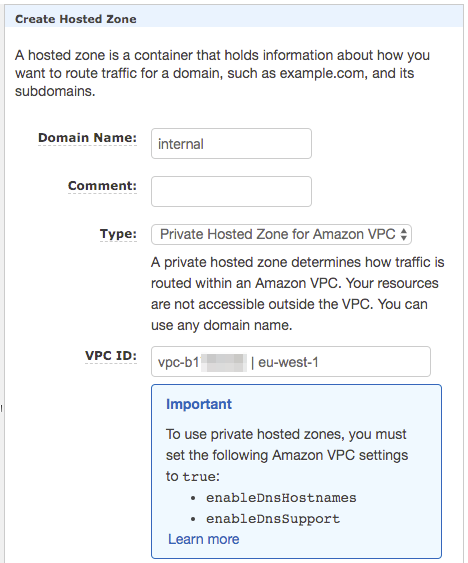
By default, the “Type” will be “Public Hosted Zone” - this means that it will be for a domain name that is publicly available to everyone on the internet. We don’t want this - we only want the records contained within this zone to be available to services inside our VPCs. We will want to go ahead and select one of the VPCs that we intend to use, so I’ve gone ahead and selected the eu-west-1 VPC. At the moment you can only select one VPC (at the moment you can only select the one VPC when creating it so we’ll retrospectively add the second VPC after.
Now that we’ve created this internal hosted zone we can go ahead and add a record for the api subdomain. Click “Create Record Set” and we’ll create a CNAME record which points the api subdomain to the previously unmemorable ip-172-30-0-224.eu-west-1.compute.internal domain, and now that is done. If we were to allow the Route53 DNS services to propagate (which tends to be pretty quick in my experience) - we could then go into any EC2 instance in our EU VPC and hit api.internal/say-hello?name=Angela and we would get the response that we expect…
But, what we want is to be able to access the memorable api.internal domain from our US EC2 instances. So let’s go back and add associate the US VPC with the private hosted zone that we’ve just set up. To do this we need to go back to the “Hosted Zones” page in Route53, and select the radio button next to our internal zone.
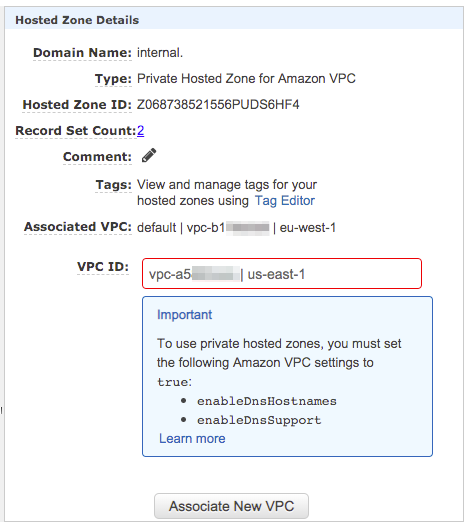
If we click in the VPC ID text box then we’ll be presented with the same dropdown box as before, and we can now select the us-east-1 VPC that we’ve been using throughout this post. Select that and hit “Associate New VPC”. This will make the private zone available in both the us-east-1 and eu-west-1 VPCs. 🤯🤯
One quick side note is to take note of the “Important” information box that is shown in the above screenshots as I ignored them initially and lost some time, wondering why I couldn’t see any of the records in my us-east-1 EC2 instance. You’ll need to double check and ensure that DNS Hostnames and DNS Support is supported in all of the VPCs listed in your “associated VPCs” section. To do this go to the VPC console (you’ll need to do this individually for each region, unfortunately).
Once you’re in the VPC console select the VPC you would like to check these properties for. When you select it you will see the information box at the bottom of the page which should look something like:
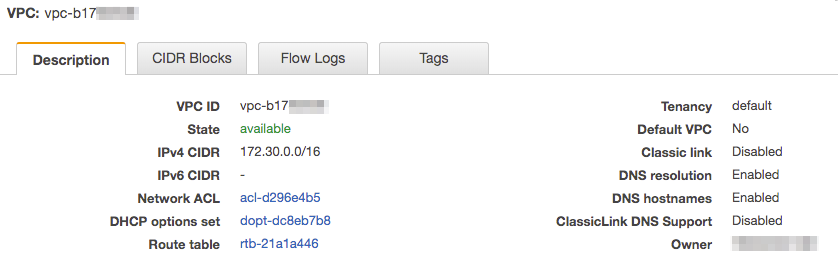
As you can see the DNS resolution and DNS hostnames are enabled. If, for whatever reason yours are disabled then (with the VPC selected) click on the “Actions” button above the VPC list and click “Edit DNS resolution” or “Edit DNS hostnames” (or both if both are disabled). Tick the checkbox in the next page to enable these properties, and then hit save. Once all of these steps have been completed we should be able to SSH into our us-east-1 EC2 box and execute the following command:
curl api.internal/say-hello?name=Angela
And we should be given the result Hello, Angela!.
🎉🎉🎉🎉
Well, it’s been a bit of a longer post than I initially intended - but it is my hope that someone who comes across a similar problem has a complete set of actions to fix their issue. Thank you very much for taking the time to read this, I hope it was informative and just a little bit interesting 😊.
I’ll catch you in the next blog post, whenever that may be!
Jamie.